
I was cruising my 10,000 blog subscriptions and I noticed my sisters in craft, Lauren of Goody- Goody, Tammi of Roxycraft and Missy of Crafty Carnival all posted a super sweet spool doll tutorial. Well guess what, I happened to have a vintage spool that a friend from one of my art groups gave me, and like a tweaker I finished this lil "Mija" around 3:30 am this morning! lol. Really, she didn't take me that long, but once I started, I couldn't stop!
Meet, Senorita Espool!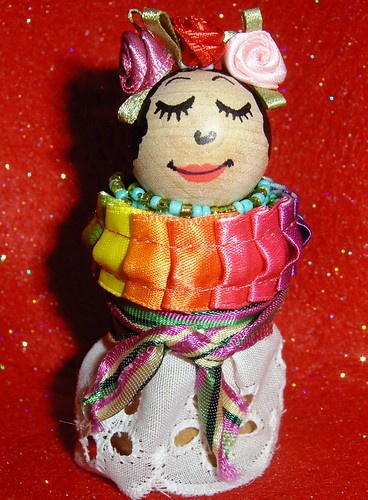

Isn't she cute? I had so much fun making this doll, and believe me, the possibilities are endless. All you need is a few scraps of this and that, and before you know it, a doll is born!
Take a look at this flickr group that show cases these spool dolls and clothespin dolls.
Here is the tutorial that I jacked from Missy who jacked it from Lauren. hee. But whatever you do, make sure you visit their blogs and add them to your favorites. Trust the Snatch, they are so worth your time!
I'm hijacking Lauren's blog for a minute to bring you this quick and easy spool doll tutorial! Of course, you can use this to make those ever popular clothespin dolls as well!
Supplies:
Different Size Wood Knobs for Heads (cheapest at Wal-Mart, but also available at any craft store)
Spools (Vintage, or craft store spools both work great!)
Wood Dowels to fit the holes in the knobs (I always purchase the variety pack at Wal-Mart so I always have the size I need.)
Paint, Brushes, paint pen in black
Clear Acrylic Sealer
Glue Gun (Optional)
Let's Get Started:
Place the knob on the dowel and I always secure it with a little bit of wood glue, all though white glue would work fine, or you skip the glue all together. But when I know I will be shipping the doll, it needs that added stability. Placing the knob-head on the dowel makes it easier to paint!
Cut the dowel down to about a 4 inch length or so. I use OLD scissors to score the dowel, and then just break it in my hand…. There’s no need to bring a saw into the house for this little project! J This is a good workable length, and we’ll cut the dowel down again later.
Now that the knob head is on the dowel, it’s time to paint the hair. Using acrylic paint, hold the head by the dowel and design your doll’s do! Once you’ve painted the hair, stick the dowel into the floral foam to let it dry. When painting the hair, I always like to look at my knob head and decide where the best place for the face would be. Sometimes there is an ugly spot, or the grain of the wood wouldn’t look nice. If you toll painted in the 80’s with your mom, like I did… this will be very nostalgic for you! LOL! Use your own judgment, but I find that it takes at least two coats for the hair to look grand. Let the hair dry.
Now that the doll hair is all dry, it’s time for clear acrylic sealer. I just take my whole floral foam block outside, and spray the doll heads all at once. Every sealer has different directions, so you’ll have to follow the directions on the sealer you choose. I use spray sealer because we always seem to have a can handy around here, and I like to do at least 2-3 coats.
Once the sealer is dry, it’s time to “paint” the face. Because the wood is knobs are dry, they suck the paint right up. When painting small details, like the face, the paint tends to run, and this is why you should seal the head BEFORE you paint the face. It took me HOURS to figure this out with my first round of dolls. I have very shaky hands, and so it’s a lot easier for me to use a paint pen than a detail brush and paint. But doing the face is the most fun part! So you do what you like!! I chose to make my faces like the 70’s Fisher Price Little People dolls. I did this for several reasons… it’s easy, I loved those toys, and I think this is a very 70’s kitschy crafty, so it lends well to that type of face!
Once your face is done, it’s time to match your knob-head to its spool body. I love the aesthetic of big head – little body. So I always try to match them up that way, but obviously, that’s not for everyone J So you do what you like! If you use a spool from the craft store, I always like to seal those with the sealer first. You can also use a vintage spool of thread
Once your body and head are matched up, it’s time for finishing details!! Place the head to the body, and make your final cut on the dowel. You’ll most certainly have to trim it down from the original 4”. I use a little glue to glue the head to the body for shipping reasons, but you can also leave it unglued, so it’s interchangeable! Wrap some vintage trim around the spool, stick it with an old pen and you’re done!!
Some optional finishes: add paper flowers or bows to the hair with a hot glue gun, trim a piece of felt to glue to the bottom of the spool for a nice finish, make a sad face for that grumpy person in your life, or a boy with a mustache! The possibilities are endless! Now that you are done! Take pics and add your dolls to the spool and clothespin doll flickr group!!
Footnote:
Since it was 2:30 in the a.m. when I started, I had to work with what I had. I didn't use the dowel because I was using round wooden balls that didn't have a hole in the bottom. No worries, I used E6000 and glued her head right on top of the spool! It worked. yay!
 Stumble It!


9 comments:
She is just lovely! I can probably discover some old spools in my basement as well. Like I need to add another craft project to my life....ha! Thanks for passing this along...it seems like a nice instant gratification project! (forcryeye)
Oh I just ADORE these dolls! I knows I gots some wooden spools somewhere, but TIME...what box is that in? (smile)
I'm jumping up & down with you!!! What a great treat to open up the pages and SEE Miss Love Squared smiling back at us!. Thrilled we pulled it off, and Xcited to discover the journey that lies ahead of us now.
HAPPY to call you sister!!!! we did it we did it
xo, Monica :)
Thanks for the blog luv Yoli! I love Senorita Espool! She's way super sweet! You done good chica!
She's cute! I love how she looks so different from Missy's spool dolls - you gave her a personality of her own! Thanks for the bloggy love too!
Is there anything you don't do?!?!?! Too cute, and tell me....how many hours are in your day?!?!?!
Girl, there is never enough hours in the day!
Oh hell! How cute are those!
your too busy, although it's summer! those spool dolls are too cute!
THANK YOU for the spray-seal-first tip! i have a whole mess of dolls that i'm making for my kid and planning on starting this weekend...how super extra timely for me to find this post. thanks again - consider yourself added to my faves!
Post a Comment