Showing posts with label dolls. Show all posts

Tuesday, August 12, 2008

The Pink Artist Debut!

Hello everyone, thank you for the kind words and wishes of a speedy recovery. I am back and ready to jump into some projects. Speaking of projects, I am cutting and pasting this blog from my Homegirl, Monica Magness of "Girl Gone Thread Wild"


I know I mentioned before that she did a call for artists to contribute 2 inch square mini quilts for a doll she was making. I had no idea the magnitude and beauty that this project would become. I will always feel so lucky and so deeply honored to have been involved.

A couple of weeks ago, I was thumbing through one of my favorite publications at Border Books, and there, staring at me, was "Our Doll!" On top of that, I even spied my little square on the dolls dress. Yay! My little claim to fame!

What is even more exciting is that you and everyone across the world has a chance to win this doll! Details are below, and if you enjoy constant beauty and inspiration, do check out Monica's blog.

(Cut and pasted from Monica's blog)


The Pink Artist Drawing Begins, Bosom Buddies Unite to fight breast cancer!

"Never doubt that a small group of thoughtful committed citizens can change the world. Indeed, it is the only thing that ever has." Margaret Mead

Welcome, welcome, welcome!!! We're so excited that the day has FINALLY come for The Pink Artist Drawing to begin! We are delighted to celebrate our journey with you!!! Our mission is simple, to spread the WORD: GET CHECKED! and please schedule those mammograms right NOW! From the beginning our promise has been to RALLY FOR A CURE for breast cancer the best way we know how and that is with ART. We pink artists have kept that promise as each of us took to our studios to use the God given tools we were blessed with- OUR HANDS. Support for our project has poured in from around the world thanks to blogs and word of mouth. This support has given us the opportunity to create from the heart a bountiful of PRIZES you could win in The Pink Artist Drawing August 1-October 15, 2008 going on right NOW. Over the course of just a few months our "call for art" grew to include well over 182 men and women, a phenomenal number that makes up The Pink Artist Project & friends who have joined our forces. To see more than 400 squares created by the pink artists personally, please stop by these posts for that joyful experience: The Pink Artist parade of squares (most artists have blog links next to their square, please come and meet our artists). Happy Browsing!

Joining our squares together we have created a 40" art doll we lovingly named, Love Squared to HELP RAISE AWARENESS & FUNDS FOR BREAST CANCER RESEARCH. Let us introduce you to the lady of the hour, The Pink Artist Doll, ~Love Squared is a symbol of hope, she stands for courage and displays that spirit of connectedness to end breast cancer for good~

To see all of our BEAUTIFUL doll photos,
please click on the links below:

Interested in seeing the making of our doll?
Please visit these posts here:

YOU can win our doll & a number of beautiful ART prizes donated by our PINK friends by helping us to raise funds for breast cancer research!

In the completion of our doll, we have further grown our circle of FIGHTERS to include Art Doll Quarterly & Artful Blogger (both on sale now at your local bookstore). In the Autumn issue of the 2008 art doll magazine, you can learn more about the stories behind our squares and LEARN just who we are as pink artists. Please have a look and let's celebrate seeing our project & doll in PRINT everybody, YAY!!!! THANK YOU to the staff at Art Doll Quarterly and AB both for their extremely generous support! We love you!

(pages 50, 51, 52, 53)
YOU can buy your issue here if you haven't already ran to the store for purchase:
And READ what Artful Blogging wrote about the BLOGGERS who took action:

(Autumn 2008, Letter from the editor)

"We have made a promise to end breast cancer forever – energizing science to find the cures is a critical part of this promise." -from Susan G. Komen website

As a project that grew from the questions, "what if?" and "What can I do?" we artists have taken on the plight to HELP a much BIGGER team of fighters here, those HARD WORKING souls at Susan G. Komen for the Cure. The Pink Artist's ART has given us a voice, a place to share the names and lives of our loved ones stricken by breast cancer, and lets the world know we mean business! Breast cancer has taken the lives of many women we call moms, sisters, aunts, cousins, friends, coworkers, and also the men in our lives ... so let's HELP stop this cancer DEAD in its tracks, WE CAN DO SOMETHING! YOU CAN JOIN US! Let's rally together as the pink artists & friends offer up our handmade art to raise donations for Susan G. Komen and the fight against breast cancer!


To enter our art drawing:

All you have to do for a chance to take home any one of the magnificent prizes is make a donation between August 1-October 15, 2008 and for every $10 donation you send in your name will go into our art drawing TWICE.

Join the fun!
Make your money order donation out to Susan G. Komen for the cure
and mail it to Monica Magness PO Box 2206 Madison, AL 35758 where your name will be entered into our art drawing and your donation will be collected & sent in directly to our charity on October 15, 2008

or

PAYPAL your donation to MLMagness@aol.com
with "The Pink Artist Drawing" in the subject header (or see our Paypal donation button at top left of blog). Your name will go into our drawing and your "gift" will be forwarded to Susan G. Komen for the cure. (Sorry no personal checks, CASH sent at your own risk)

Please make sure your name and address are legible,
typed is best for accuracy. Your name & information
will not be sold or shared with any other party.

Thank you for your help in raising those funds for

Donations will be accepted up until October 15, 2008
which is the OFFICIAL day of the drawing.

Winners names will be announced on my blog on the evening of October 15th.

The month of October is as you know Breast Cancer Awareness month.
Together let's make this a fun & rewarding way to HELP BIG.

Artists such as Michelle Ward, Alma Stoller, Tim Holtz, Donna O'Brien, Cheryl Strait, Donna Engstrom, Patti Culea to name just a few, and Stampington & Company have teamed up with us to become pink artists, or have HELPED to offer art up, and/or have gotten the word out for us in flyers, newsletters & Postscript. Won't you join us?

Let's watch the DONATIONS grooooow as our fundraiser will be totaled weekly and shown in the upper left corner of my blog for ALL of us to see.

EDITED 8/2: Please take a moment to ENJOY LIFE TODAY! Do something special just for you & your loved ones! Below are photos of a candle vigil my family held last night at 6 pm to honor our loved one who passed from Pancreatic Cancer, Carlos Vallejo, the man who instilled in me THE POWER THAT ONE PERSON CAN MAKE A REAL DIFFERENCE... from my sister and her family in Arizona, to my parents in Texas, to my brothers family in Pennsylvania, to my own family here in Alabama, we sent off heal-ium balloons, tucking in a note and letting it flyyyyy... fly away...up to the heavens... to spread our LOVE to my uncle who left this earth TOO SOON... and also held a prayer vigil in his honor.

Uncle, THANK YOU for guiding this project to its beginning and its end. I love you.

(my beautiful mom in TX)

(my awesome nieces & nephews in AZ)

I love you pink artists! You made my dreams come TRUE.
So, in the name of ART & FUN... let's RALLY TOGETHER bosom to bosom and HAVE OURSELVES A CELEBRATION!! we worked really hard for this moment and it's finally here!
xo, Monica

Saturday, July 26, 2008

Senorita Spool Y Spool Doll Tutorial

I was cruising my 10,000 blog subscriptions and I noticed my sisters in craft, Lauren of Goody- Goody, Tammi of Roxycraft and Missy of Crafty Carnival all posted a super sweet spool doll tutorial. Well guess what, I happened to have a vintage spool that a friend from one of my art groups gave me, and like a tweaker I finished this lil "Mija" around 3:30 am this morning! lol. Really, she didn't take me that long, but once I started, I couldn't stop!

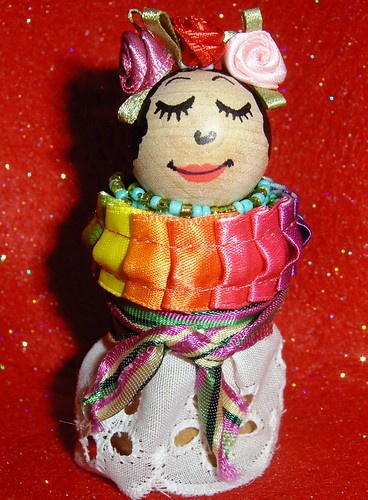
Meet, Senorita Espool!


Isn't she cute? I had so much fun making this doll, and believe me, the possibilities are endless. All you need is a few scraps of this and that, and before you know it, a doll is born!

Take a look at this flickr group that show cases these spool dolls and clothespin dolls.

Here is the tutorial that I jacked from Missy who jacked it from Lauren. hee. But whatever you do, make sure you visit their blogs and add them to your favorites. Trust the Snatch, they are so worth your time!

I'm hijacking Lauren's blog for a minute to bring you this quick and easy spool doll tutorial! Of course, you can use this to make those ever popular clothespin dolls as well!

P1012090

Supplies:

P1012079

Different Size Wood Knobs for Heads (cheapest at Wal-Mart, but also available at any craft store)

Spools (Vintage, or craft store spools both work great!)

Wood Dowels to fit the holes in the knobs (I always purchase the variety pack at Wal-Mart so I always have the size I need.)

Paint, Brushes, paint pen in black

Clear Acrylic Sealer

Glue Gun (Optional)

Let's Get Started:

Place the knob on the dowel and I always secure it with a little bit of wood glue, all though white glue would work fine, or you skip the glue all together. But when I know I will be shipping the doll, it needs that added stability. Placing the knob-head on the dowel makes it easier to paint!

Cut the dowel down to about a 4 inch length or so. I use OLD scissors to score the dowel, and then just break it in my hand…. There’s no need to bring a saw into the house for this little project! J This is a good workable length, and we’ll cut the dowel down again later.

Now that the knob head is on the dowel, it’s time to paint the hair. Using acrylic paint, hold the head by the dowel and design your doll’s do! Once you’ve painted the hair, stick the dowel into the floral foam to let it dry. When painting the hair, I always like to look at my knob head and decide where the best place for the face would be. Sometimes there is an ugly spot, or the grain of the wood wouldn’t look nice. If you toll painted in the 80’s with your mom, like I did… this will be very nostalgic for you! LOL! Use your own judgment, but I find that it takes at least two coats for the hair to look grand. Let the hair dry.

P1012081

Now that the doll hair is all dry, it’s time for clear acrylic sealer. I just take my whole floral foam block outside, and spray the doll heads all at once. Every sealer has different directions, so you’ll have to follow the directions on the sealer you choose. I use spray sealer because we always seem to have a can handy around here, and I like to do at least 2-3 coats.

Once the sealer is dry, it’s time to “paint” the face. Because the wood is knobs are dry, they suck the paint right up. When painting small details, like the face, the paint tends to run, and this is why you should seal the head BEFORE you paint the face. It took me HOURS to figure this out with my first round of dolls. I have very shaky hands, and so it’s a lot easier for me to use a paint pen than a detail brush and paint. But doing the face is the most fun part! So you do what you like!! I chose to make my faces like the 70’s Fisher Price Little People dolls. I did this for several reasons… it’s easy, I loved those toys, and I think this is a very 70’s kitschy crafty, so it lends well to that type of face!

P1012083

Once your face is done, it’s time to match your knob-head to its spool body. I love the aesthetic of big head – little body. So I always try to match them up that way, but obviously, that’s not for everyone J So you do what you like! If you use a spool from the craft store, I always like to seal those with the sealer first. You can also use a vintage spool of thread

Once your body and head are matched up, it’s time for finishing details!! Place the head to the body, and make your final cut on the dowel. You’ll most certainly have to trim it down from the original 4”. I use a little glue to glue the head to the body for shipping reasons, but you can also leave it unglued, so it’s interchangeable! Wrap some vintage trim around the spool, stick it with an old pen and you’re done!!

P1012092

Some optional finishes: add paper flowers or bows to the hair with a hot glue gun, trim a piece of felt to glue to the bottom of the spool for a nice finish, make a sad face for that grumpy person in your life, or a boy with a mustache! The possibilities are endless! Now that you are done! Take pics and add your dolls to the spool and clothespin doll flickr group!!

Footnote:

Since it was 2:30 in the a.m. when I started, I had to work with what I had. I didn't use the dowel because I was using round wooden balls that didn't have a hole in the bottom. No worries, I used E6000 and glued her head right on top of the spool! It worked. yay!

Do give this lil project a try, it is so much fun! Oh, and be sure to check out Pimp Stitch. They have the coolest patterns for sale and for a limited time, they are giving away a few adorable stitch patterns. Andale!

Thursday, July 17, 2008

A Day of Frida, Shopping, Arte and Crafts Galore

Ok, pobrecita, Frida, I had no idea she wore butt huggers!

So last month, ( I can't believe it has almost been a month already) Krissi and I jetted on over to the MOMA in San Francisco to A, celebrate Krissi's 32nd birthday, ::cough, cough::(she is six months older than me. Trust me, she loves to point this out) and B, Go see our girl FRIDA!
I know, I know, I talk about her all the time, but hey, what can I say, she's tight like that.

Anyhoo, if you get a chance, that show is running through the end of September and it is so worth the visit. I am even more in love with her paintings and her humor! OMG, this woman knew how to get her clown on, mmmkay? She was sick and twisted just like me! Ayeeeeeeeee!

I tried to take some pictures, but trust me, they had regulators ALL over the place, and I wasn't about to get bounced out of there before getting my fair share of Frida. I did however gank a whole bunch of postcards and programs! :-).

Hey, I look at trash with a whole new perspective. I feel it is my small contribution to being green, because the Santos know I have done my share of waste and then some. I am working on being better though. I am forever sifting through my trash and telling my friends and neighbors to give me their empty pasta and cereal boxes. (Great for book covers and postcards)

Ok, back to our awesome dia.

After our tour de Frida, we went to the gift shop where we got suckered into buying all kinds of Frida gear. I walked out with postcards, Frida paper dolls, stickers, a children's Frida Coloring book and some cards. Krissi bought a gang of gear too.

From there, we were STARVING, so we headed out to the Mission. This is Krissi's old stomping ground and she took me on a serious stroll down memory lane. I got to see "her" Mission, lemme tell you, it was bright, colorful and beautiful. Reminded me of my days back in San Jo.

We got our grub on at this taqueria, and then we checked in an awesome bakery. Remember those horns, Girl? AWESOME.

We also peeped inside Dog Eared Books, one of my favorite stops, followed by visiting this this cool little shrine, voodoo store. (I forgot the name) I bought some resin incense. I love the smell of frankincense.

After a few more blocks, we headed back to Krissi's ride and drove to Berkeley, for a quicky stop at Paprus They have a great selection of hand dyed and specialty papers. I am telling you, we were on a roll. From there, Krissi took me on a cruise down Telegrah for some herbal brownies. I AM KIDDING!. haha. I told Krissi out of all the times I had been to Berkeley, I never took the time to check out the famed Telegraph Avenue. She told me that was a complete shame and took me out for a drive by. Thank you Krissi!

From there we started our descent back home, but of course, we spied a Michael's craft store on the way, and we just couldn't pass by without stopping, right? lol

I tell ya, we got our shop on and then some. We left at 9 am and didn't get home till about 10:30 pm. It was such a great day and I really wanted to share it all with you.

After all that Fridaliciousness, I became inspired and had a lot of swaps to complete. Guess what who I sent out to all my partners?.....................

Picture time.........

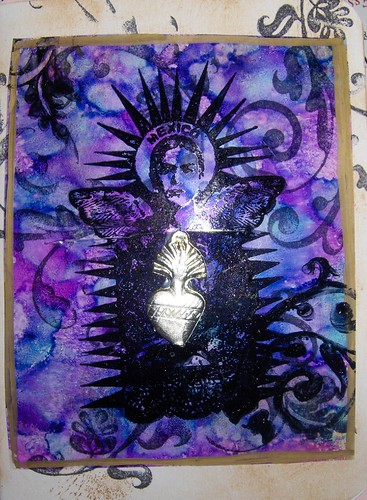
this was a card I made for Krissi's birthday. It was made of recycled materials, and alcohol inks. (My latest and current favorite medium)


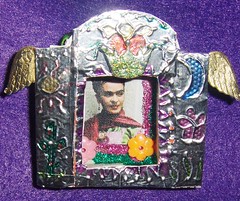
This was a small matchbox shrine I made for my partner. It was an actual Frida themed project. I h

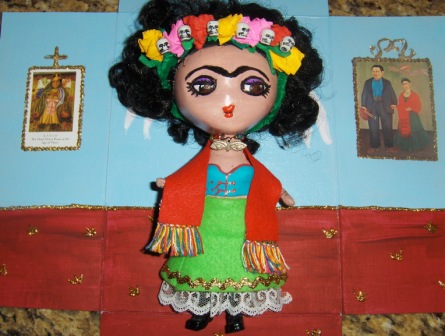
This is an oldie but goodie, I made this doll last year for a fundraiser. She is an altered doll, that I hand panted and dressed up. She even came with a back brace and her body cast was made out of polymer clay. I altered the box she came in to look like one of her rooms.
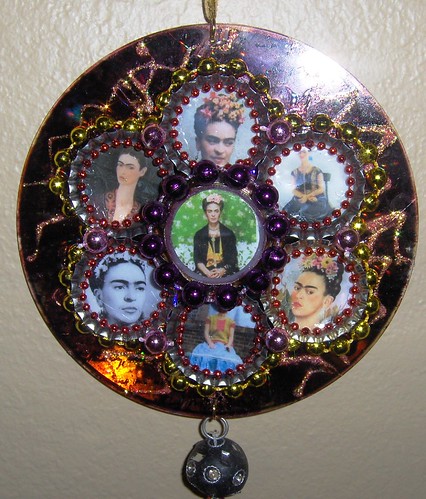
I made this ornament for a recycled project. I have to still give it to my partner and since she lives in town, I plan on delivering it to her. I used alcohol inks and recycled cd's, bottlecaps and beads and charms.
This was made for a altered CD swap. I learned these techniques from the wonderful Cyndi. She tought us this class on board the Crafty Chica Cruise earlier this year. By the way, the Cruise in happening next march. If you are looking for a quick retreat of Crafts, Chica's and good food, be sure to join us. I will be teaching a class on next year's cruise.

The next two pics are ATC's I made for another swap. (Yes, I am a swap addict)


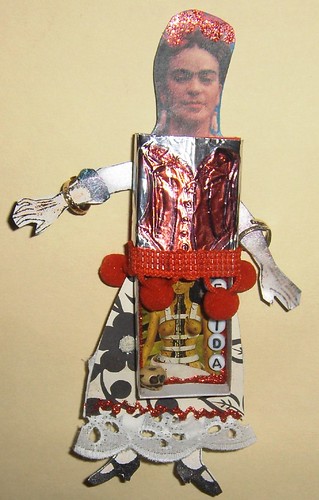
This last picture is a Frida matchbox shrine paper doll I made for Cyndi of Santa Clarita Craft Lab. Good Gawd, wait till you see what she sent me. (stay tuned)
and that concludes your daily dose of Frida. hee. My next blog will be a few features, tutorials, and upcoming events. be sure to check back.

Orale Pues,

Yoli

Saturday, May 10, 2008

Jeepers Creepers!

Yes, I can do more than Frida and Guadalupe! So number 1 son (oldest, not that I adore him anymore than number 2 son) flew the nest. Yes, I am that much closer to being an "empty nester" well, not that much closer, being that I have 200 people that still live with me. Ok, not 200, but sometimes it feels like it!

Number One Son has joined the ranks to being a renter. I told him it is not easy, and to please finish school and hold out as long as he can. It's hard out there! But being the strong headed independent kid that he has always been................ He bounced.

From day one, that kid has always been on a mission to grow up. He walked at 10 months old, talked early, RAN early, tried to grow up as fast as he can. It was like raising a little old man. He had to KNOW everything and had to always be right. I would always say,:"SLOW DOWN! " (at least for my sake)

Now my other son........................ well that is a different blog.

Anyhoo, my son gave me an unfinished wooden key holder and asked me to decorate it. "Mom, NO Frida or Guadalupe please" I was like, "Guat?" lol, Okayyyyyyyy, I can do more then my favorite icons, Helloooo!

I scoured my clip artsy fartsy books and decided to make it creepy and cool. I settled on some monster looking vintage comic images. I still painted it a vibrant green, but I thought it would go great with the images.

Verdict came in, and he was very pleased. "Cool Mom, this is tight!" I'll take that as a, "Oh Mom, this is the best thing ever!" (my kid is pretty skimpy in the compliment department, so I will take what I can get, mmmmkay?""

Second is a Haunted Dotee that I made for a swap. I made the face out of polymer clay and used some of my favorite left over halloween fabric.

I am currently working on some fabric postcards and fabric atcs. (stay tuned)

Next blog will be my visit to the Maker Fair last weekend!

Thursday, April 10, 2008

Beary Adorable. (A boy meets girl story)

Hey everyone, After my blog on the Bear I made for my nephew, I recieved this wonderful letter from one of my readers! I was so touched with her story, I asked if I could repost it and blog it here for your enjoyment. She gladly agreed, and I hope it puts a smile on your face. I just love Amore and Romance!

Thanks for Sharing Belia! Best wishes to you and your "Sweetie"

(pictures may take a minute to load, but well worth the wait!)

From: *La BabyBruja*C/S
Date: Apr 3, 2008 1:10 PM


Senorita Sacred Snatch-
Yay! After I saw your bear I got inspired and made my own. Here’s the story of my osito... my companero-sweetie always tells me how the first time we met I was wearing this red shirt, which was decorated with the phrase "Enjoy California" in the Coca-Cola logo style.
I felt sorta self-conscious when I put it on because I knew a little about Coca-Cola’s anti-union worker abuses in Colombia, but I figured I wanted to rep California here in NYC, and most people wouldn’t make the connection anyway.
And then I met him, a lefty-Colombiano who had done some organizing against Coca-Coal’s labor practices in Colombia. Of course, he didn’t think the shirt was so cute. But he used it as a conversation opener to ask me about Cali- and then it was on!
Anyway, I washed it, and it hella shrank, but I kept it for the sentimental value and always hoped I could figure out something to do with it.
As soon as I saw your bear, I knew how to turn it into an awesome gift! I even stuffed it with a little mushy love message letter hidden inside.
So, thanks for passing on the inspiration, and I LOVE your blog and all your awesome craftiness.
-Belia LaBabyBruja


...... ......................


...... ......................

Thursday, March 27, 2008

From the Studio of Girl Gone Thread Wild

AKA, my homegirl, Monica............

Monica was the brainchild of this wonderful project. I humbly asked if I can contribute, and thankfully she accepted. In fact, I believe over 150 art squares have been donated! See these links for further info. (Trust me, this project is as beautiful as it is inspiring)


On to the building of the doll...............

The Pink Artist Doll Project, page ONE

From start to finish here is
the journey of the collaborative art doll project
come to be known as Love Squared.
Page one.
...
It's been a fantastic break!
The past week flew by and I admit
I only dreamed of the squares ONCE
but it was grand that I did!
Pinpricked I made a new best friend
to keep me company while
stitching in the wee hours,
enjoying a continual pouring of tea,
movies, and phone calls
that kept me tied to reality.
...
I'm going back to the start for a moment.
It only makes sense to tell you
that the inspiration for the doll body
came from a long admired doll artist,
Patti Culea using upper torso patterns
I knew when taking on this project
that some part of this doll had to
have Patti written all over it.
...
Omitting of course the legs and
opting to alter the length so to fit
squares to skirt. Some of you have
seen the first few photos already
so I won't reiterate those steps, jumping
forward instead to the creation of the
skirt and the sewing on of the squares...


Choosing 2 cuts of decorator fabric in colors
blue and beige cut 72" by 54" and
folded in half twice to make a center,
a hole was cut and the layers were draped
over the waist of the doll and stitched in place.
An old lace piece is stitched down to doll
covering the uneven edges.


Not noticing earlier that the blue fabric already
had "square" shapes in the design (lol) I
took this as a sign and jumped right in
to begin there, pinning the first square.
I kid you not, there is a higher power
orchestrating this doll as I have been
stress-free from the beginning and
am remaining calm and overjoyed here-
I think I even sang OUT LOUD when
applying the first SQUARE. -laughs-

The squares were beginning to line up.
What I found happening was that it was easier
to NOT preplan anything, nor did I pull
more than 10-12 squares at one time from their shelter
(ie. storage tub). I didn't lay out the squares
ahead of time. These weren't color-coded
or grouped in any way whatsoever.
Really the only measurements being taken
were the actual size/shapes of the squares.
One by one, literally the squares came together.
Hand sewing each square with PINK thread.


What did happen is a metal tomato cage
for gardening was inserted under her skirt
to help keep shape.

I found myself talking to the squares
and remembering your notes, stories,
friends and family. I'd be lying if
I said I didn't choke up once or twice...
but it was HAPPY tears for this project.
It was NO accident that I signed online
ONCE to tell a gal her squares arrived
safe & sound from TURKEY and when
doing so read a note from one wise lady
who told me of the "threads of life"
and the first thread being the umbilical cord,
also while online that brief period I read
every comment you made during the last post.
Gerry!!! yours hit me especially...
mostly because you remarked how wonderful
tho sad this project is and well,
I didn't DO NOT want anyone remembering
this project as SAD so...

I immediately started to create a face for our doll.
Starting with a grey felted sweater scrap,
sewn on the machine to resemble
a round head shape, a wooly ball...
stuffed with polyester fiberfill,
punching away on the flesh colored
wool roving from Great Britain
found in a local Yarn shop I
just recently discovered during
my last visit to the Goodwill...
(taking breath)

There she was smiling up at me,


with those pink lips and light brown eyelashes,

and curvy eyebrows.

Now, that's a Kool-aid smile!

happy-happy-happy

I'd like to tell you that all squares are now

stitched to our dolls skirt, but I was just 12 shy

when making this post. In just a few minutes I'll

update our parade of squares, page 3 to include

two more artists squares making that the

last 12 squares to go on the doll.

My goal is to have our doll completed by April 1.

.....
Please excuse the lighting in the photos.

Most often the images were taken

around midnight and by myself.

I am sooooo not a photographer.

......
Also, THANK YOU to Donna O'Brien of the blog,
The Ribboned Crown
for mailing in this exquisite donation
for our doll.

From here my next post won't be until next Monday

as I have to play catch-up, but I am officially back online,

checking emails and keeping in touch with YOU!

Next post WILL be more progress made on our doll

wso be sure to check back in March 24. w

-Thanks again & again for your support & participation-

May this doll leave your heart filled with JOY

and a smile in your every step,

HAPPY EASTER!!!

HAVE A BLESSED DAY


wait, there is more............. here is a link to part two, where the doll's face, hair and limbs are formed.

Are you as flabbergasted as I am? I just had to share and if you haven't already, subscribe to her blogs! She is a super star blogger on blogspot and she is really a down a$$ ruca with a killer personality!