Showing posts with label altered. Show all posts

Tuesday, July 29, 2008

Recycled Business Envie Tutorial

It's time for another easy sleazy tutorial from your girl, La Sacred Snatchy! I was inspired to write this tutorial after participating in an altered Business Reply Envelope swap, hosted by my homegirl, Juli of Swap-bot. I have thrown away countless junk business reply envelopes that always annoyed the scrap out of me! Anyhoo, after altering just one envelope, I was hooked and now I am actually telling the peeps at my office to give me all their junk envies! I will never buy envelopes again and I have a something to do with all the scraps of paper I feel to guilty to throw out! It's a win, win, situation, I tell you! (Not to mention the "Green" aspect, either!)

So today, we are going to turn this hot mess,
all my bits and pieces of ephemera a.k.a. scraps of this and that,


and these basic supplies. (Junk Business Reply Envies, scissors, and glue sticks)


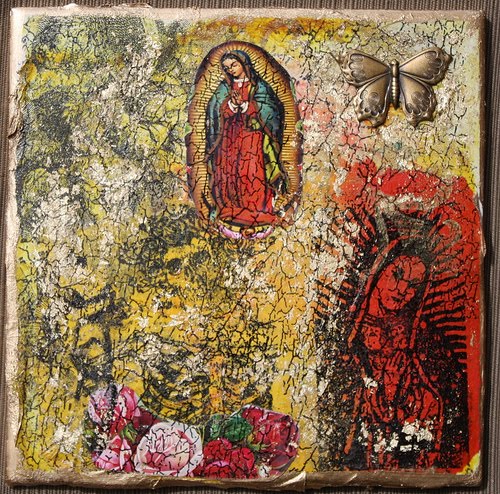
Into this! Wonderful artful pieces of mail to send to those you love!


I highly recommend a good quality glue stick. You don't want your masterpieces falling off en route to your lover or Sancho. (shhhh) You can actually use any glue, I just love glue sticks at the moment and I have even used them successfully gluing fabric to paper. (that is another tutorial in the works)

Anyhoo, cover the front of your envelope real good with glue. Especially the edges of your envelope. Note, if your envie has a window that is not covered. I simply stick a piece of paper on the inside of the envie, and when I get busy with my gluing, it will eventually adhere to the decorative papers I stick on the outside.

Then turn your glued envie face down on the back of your paper of choice and burnish real good. If you are using scraps , just lay your scraps all over your envie and burnish from there.
Like I said, burnish, or smoosh with your hands real good! Don't worry about trying to align your papers within the envie, because you can always cut around your envelope after gluing to remove any extra papers.
I just cut around my envie. See how it looks all nice and even?

Ohhhhhhhhh, here is the fun part, Embellishing! Sky is the limit. For real, you can not screw up this project. Ok, well, maybe a little. Make sure your embellishments are flat and not bulky. You don't want them getting ripped off in the mailing process! I use pics, glitter glue, fabric, ribbon, rubber stamps, inks, crayons, oh who am I kidding, I use everything!Don't forget the backside either!

Tada............ Finito. For real, you can spend a whole lot of time on this project or you can whip one of these out in no time! I think this would be a great project for the kids too!

Please give this craft a try, and when you do, post a link to your artwork!
Viva La Arte!

Tuesday, June 17, 2008

Sex and the Swap

I can only imagine what kind of hits my blog will get with that title! I am still having a hard time living down the word Puta and how many people are directed to my site based on someone googling that word!

So a while back, I hosted a Sex and the City Swap with a few stellar swap homies of mine. The premise was to design or purchase a handbag that your favorite character would wear and fill it with goodies that you would find in her purse. I couldn't wait for this swap to begin! I have been a fan for years and I ran with the masses at opening night to watch my girls in action. However, I do think I may need to see the movie again, because if felt like I shoved an entire season in a couple of hours!

After a little Sexy inspiration,I decided to make, for my partner, a handbag that I think Carrie Bradshaw would wear. I ended up going after an evening look. I noticed her character had some love going on with the feathers and came up with this creation. I know it looks simple, but trust me when I say, working with that glittery fabric was no joke! I almost threw out my machine twice and I could not get the tension right to save my life. After a few frustrating days, I finally finished it! I gave it a pretty interior lining with a black and white floral silky pattern and then I decided to line the outside with some sexy black lace. I will admit, I did purchase the handle, but only because I didn't like the pearl selection I had in my stash.


Filling it was the fun part. I included a mini journal to jot her thoughts down. Some gum for that smoke she would sneak in here and there. A mini album filled with pictures of her, Big, and her girlfriends. Some fun earrings and a huge black blingy diamond ring. Some gloss and some lube. lol, Carrie did like to get her groove on too. She just wasn't so vocal about it. I also included a perfume sample in the event she had a close in counters with Big on a moment's notice!


A few days ago, came my SATC handbag from my wonderful partner, Kathy. OMG, this was her first swap ever and she blew me out the water. Kathy is an amazing crafter and seamstress. She makes awesome dresses, jackets, aprons and the list goes on and on. This bag, including the handle is all handmade. I rawked this bag at a wedding this weekend and received lots of compliments!


But wait, it gets even better! She totally captured Samantha's essence in this bag and it's contents! I mean, really, how much better does it get?

Inside was a manual on some very "interesting" positions. Various lubes and "Dickie" Breath mints. The little captions she wrote on the packaging had me cracking up. Condoms of course were a given, a beautiful blingy bracelet, some Dicky Charms, a Wash the Sins away packet. (perfecto) A birthday card celebrating Samantha's 50th birthday, and a great album with pics of the girls.


Oh and here is the Piece de Resistance............................. Samantha's famed pearl Thong! (Handmade but of course!)


lmao, how awesome is that? Then to add even more to my score. I rec'd another fabulous package from my homegirl, Juli.

She knocked my chonez off too. The Swap was called Literary Surprises. The premise was to select a book and create a package and or craft that incorporated the book. That lil sneak went to my Amazon wish list and created a bonanza of a package around the book.(Scraptastic) by the way, the book rawks, and I highly recommend it. It is filled with easy and creative techniques. You know I am all about the technique. I feel some tutorials coming people!

Feast your eyes! Not only did she include tons of beautiful ephemera, she also painted a mini masterpiece for me utilizing one of the techniques from the book!


Kathy and Juli, Thank you so much for your creativity and generosity! You have truly captured the spirit of a great swapper!

Thursday, March 27, 2008

From the Studio of Girl Gone Thread Wild

AKA, my homegirl, Monica............

Monica was the brainchild of this wonderful project. I humbly asked if I can contribute, and thankfully she accepted. In fact, I believe over 150 art squares have been donated! See these links for further info. (Trust me, this project is as beautiful as it is inspiring)


On to the building of the doll...............

The Pink Artist Doll Project, page ONE

From start to finish here is
the journey of the collaborative art doll project
come to be known as Love Squared.
Page one.
...
It's been a fantastic break!
The past week flew by and I admit
I only dreamed of the squares ONCE
but it was grand that I did!
Pinpricked I made a new best friend
to keep me company while
stitching in the wee hours,
enjoying a continual pouring of tea,
movies, and phone calls
that kept me tied to reality.
...
I'm going back to the start for a moment.
It only makes sense to tell you
that the inspiration for the doll body
came from a long admired doll artist,
Patti Culea using upper torso patterns
I knew when taking on this project
that some part of this doll had to
have Patti written all over it.
...
Omitting of course the legs and
opting to alter the length so to fit
squares to skirt. Some of you have
seen the first few photos already
so I won't reiterate those steps, jumping
forward instead to the creation of the
skirt and the sewing on of the squares...


Choosing 2 cuts of decorator fabric in colors
blue and beige cut 72" by 54" and
folded in half twice to make a center,
a hole was cut and the layers were draped
over the waist of the doll and stitched in place.
An old lace piece is stitched down to doll
covering the uneven edges.


Not noticing earlier that the blue fabric already
had "square" shapes in the design (lol) I
took this as a sign and jumped right in
to begin there, pinning the first square.
I kid you not, there is a higher power
orchestrating this doll as I have been
stress-free from the beginning and
am remaining calm and overjoyed here-
I think I even sang OUT LOUD when
applying the first SQUARE. -laughs-

The squares were beginning to line up.
What I found happening was that it was easier
to NOT preplan anything, nor did I pull
more than 10-12 squares at one time from their shelter
(ie. storage tub). I didn't lay out the squares
ahead of time. These weren't color-coded
or grouped in any way whatsoever.
Really the only measurements being taken
were the actual size/shapes of the squares.
One by one, literally the squares came together.
Hand sewing each square with PINK thread.


What did happen is a metal tomato cage
for gardening was inserted under her skirt
to help keep shape.

I found myself talking to the squares
and remembering your notes, stories,
friends and family. I'd be lying if
I said I didn't choke up once or twice...
but it was HAPPY tears for this project.
It was NO accident that I signed online
ONCE to tell a gal her squares arrived
safe & sound from TURKEY and when
doing so read a note from one wise lady
who told me of the "threads of life"
and the first thread being the umbilical cord,
also while online that brief period I read
every comment you made during the last post.
Gerry!!! yours hit me especially...
mostly because you remarked how wonderful
tho sad this project is and well,
I didn't DO NOT want anyone remembering
this project as SAD so...

I immediately started to create a face for our doll.
Starting with a grey felted sweater scrap,
sewn on the machine to resemble
a round head shape, a wooly ball...
stuffed with polyester fiberfill,
punching away on the flesh colored
wool roving from Great Britain
found in a local Yarn shop I
just recently discovered during
my last visit to the Goodwill...
(taking breath)

There she was smiling up at me,


with those pink lips and light brown eyelashes,

and curvy eyebrows.

Now, that's a Kool-aid smile!

happy-happy-happy

I'd like to tell you that all squares are now

stitched to our dolls skirt, but I was just 12 shy

when making this post. In just a few minutes I'll

update our parade of squares, page 3 to include

two more artists squares making that the

last 12 squares to go on the doll.

My goal is to have our doll completed by April 1.

.....
Please excuse the lighting in the photos.

Most often the images were taken

around midnight and by myself.

I am sooooo not a photographer.

......
Also, THANK YOU to Donna O'Brien of the blog,
The Ribboned Crown
for mailing in this exquisite donation
for our doll.

From here my next post won't be until next Monday

as I have to play catch-up, but I am officially back online,

checking emails and keeping in touch with YOU!

Next post WILL be more progress made on our doll

wso be sure to check back in March 24. w

-Thanks again & again for your support & participation-

May this doll leave your heart filled with JOY

and a smile in your every step,

HAPPY EASTER!!!

HAVE A BLESSED DAY


wait, there is more............. here is a link to part two, where the doll's face, hair and limbs are formed.

Are you as flabbergasted as I am? I just had to share and if you haven't already, subscribe to her blogs! She is a super star blogger on blogspot and she is really a down a$$ ruca with a killer personality!